Moving and Handling
Please note, these materials are intended for those who have attended - or are about to attend - training.
Reading the materials without attendance does not constitute compliance. If you have any queries please email PeopleDevelopment@eastdunbarton.gov.uk
Moving & Handling Practical Session - Guidelines
During the session
- Follow the instructions given by your trainer
- Work to your own capabilities and physical limitations
- Do not undertake any manoeuvre that you feel could be beyond your normal everyday working capabilities
- Inform your trainer should you feel any pain or discomfort during any of the practical techniques: stop immediately!
- Inform your trainer if you feel tired or unwell
- Please behave in a responsible and professional manner and be aware of the Health & Safety of fellow delegates
- Please do not eat sweets or chew gum
- Inform your trainer if you wish to revisit any of the practical techniques
- Inform your trainer if there are any techniques which you need for your workplace which have not been covered in this session
- Remember, everyone takes part in the practical skills sessions, it is a participatory course.
10 Basic Principles
- Prepare your environment
- Select appropriate handling aid/equipment if required
- Communicate effectively with the client and fellow care workers
- Start and finish move with stable base
- Keep knees and shoulders relaxed
- Keep line of gravity within base of support
- Adopt a ‘palmar hold’ (flat hand hold and fingers flexed slightly to avoid pressure or pinching)
- Give support from hips and thighs
- Lead with the head
- Completion of move
Also remember to effectively communicate with the client, providing clear instruction and reassurance.
Ten Basic Principles for Practical Techniques
When teaching your delegates these are the key principles you are advised to be demonstrating. When assessing your delegates' compliance these are the key principles you are advised to assess against
1) Prepare your environment
- Ensure there are no floor slip trip hazards.
- Be aware of any contours in the floor surface
- Ensure you have enough space to execute the move safely.
- Ensure you have adequate lighting
- Maintain the room at a comfortable temperature and keep well ventilated
2) Select appropriate handling aid/equipment if required
- Ensure you fully understand the aid equipment's function and how to use it
- Ensure it has been appropriately inspected to meet legal requirements.
- Make a visual check of the aid equipment prior to use
3) Communicate effectively with the client and fellow care workers
- Ensure you ask for the client's permission to move them before commencing
- Ensure somebody takes the lead and informs everybody what they are going to say
- Ensure the client has any equipment (hearing aids/glasses etc.) available to them to ensure effective communication
- Keep language clear and concise.
4) Start and finish move with stable base
- Keep both feet flat to the floor if possible. All four points of both feet heels and toes) to maximise stability
- Feet should generally be shoulder-width apart
5) Keep knees and shoulders relaxed
- Softening relaxing very slightly bending your knees brings your centre of gravity further be the floor and increases your stability,
- This position also enables you to maximise the efficiency of your leg muscles these are much stronger than your back muscles
- Relaxing your shoulders ensures you do not build up tension in your neck muscles and encourages you to keep your arm-levers short. This ensures you stay close to the client.
6) Keep line of gravity within base of support
- Keep your 'spine in line'.
- Avoid a twisting action by moving your trunk and/or hips . move your feet to change direction. Keep your nose over your toes which will avoid you twisting your neck.
7) Adopt a 'palmar hold' (flat hand hold and fingers flexed slightly to avoid pressure or pinching)
- When holding the client ensure you avoid a gripping or pinching action with your hands or fingers.
- This position generally keeps the wrist relaxed and avoids tension in your hand muscles
8) Give support from hips and thighs
- Use the strongest muscles in your body to power the move.
- Move your body as the client moves keeping close to their centre of gravity (pelvis).
9) Lead with the head
- Keep your eyes forward and move your head then shoulders and trunk in the line of movement.
10) Completion of move
The client should be left safe and comfortable at the end of the move.
- Ensure environment is free of hazards.
- Document and report and changes
Hoisting and Sling Application/Removal
Your trainer will discuss and practise a number of hoisting scenarios with you during the course.
Ensure that you have made your trainer aware of your requirements for this session before moving on.
Every manufactured hoist and sling is different. It is in the interests of the hoist manufacturers and suppliers of this equipment for you to operate them safely. Therefore many manufactures offer a good amount of online advice in the form of detailed instructions for use, assessments and selection! identification tools. It is advisable to read this information before using such equipment.
A detailed risk assessment should be in place for every client that requires hoisting. The following pages are a brief summary of the key principles involved in operating patient hoists and slings as safely as possible.
Hoists should be used for adults and children who are immobile or are very heavily dependent. The manufacturer/suppliers instructions should be followed at all times.
Under The Lifting Operations and Lifting Equipment Regulations 1998 hoists and their accessories should be inspected by a competent person at least every six months and recorded for the care worker and client to see.
All care workers require thorough training in the use of any hoist and sling that they will be using with clients in their care. This training should also instruct the care worker how to conduct simple safety checks prior to use. These checks should include:
- that the host has been charged (if appropriate)
- that all mechanisms of the hoist are working i.e. brakes, wheels, chassis widener, emergency lowering device etc
- that all components of the hoist are present and intact with no obvious wear and tear
- that the boom is properly centred between the chassis
- that the sling's material, stitching and loops/fasteners are intact with no obvious wear and tear. This can be observed by holding it up to a window in bright daylight, or a bright lamp
- that the manufacturer's instructions are available and being applied
- safety information on the hoist and slings should be visible e.g. safe working load, serial numbers and inspection dates etc.
Unfortunately accidents can occur during hoisting for a variety of reasons, these include:
- wrong size sing has been selected
- the client is over the weight limit of the slinghoist
- wrong type of sling has been selected
- the sling and hoist are not compatible
- the sling or hoist are in poor repair
- the sling has been incorrectly positioned on the client,
- the sling has been incorrectly attached to the hoist,
- the client has been left unattended
- the hoist has been transported over a long distance or over an inappropriate surface and has overturned.
- the hoist has been made unstable by moving the boom outside of its base of support (leg space).
To manage these situations all slings should be correctly sized for the client, guidance on this appears on page 186 of this book. A letter or 'statement of compatibility should be available from sling manufacturer/supplier if the hoist and sling are a different make. Slings should be fitted following the manufacturer's or supplier's guidelines. Unless a detailed risk assessment says otherwise, a client should never be left unattended in a hoist. Effective training and instruction as well as workplace supervision to use hoists and slings safely should be available to all staff on a regular basis. Hoists should not be moved any distance with a client in them and should never be moved over uneven floor surfaces.
The individual details of a client's hoisting activity should be documented in their handling risk assessment, care plan, and/or mobility plan. This Information should detail the hoist type, for which care activity it is used, the sling size and type as well as the details of the loop clip attachments for the client's safety and comfort, as well as the numbers of care workers required to complete the activity. It should be noted that if the risk assessment care plan mobility plan defines 'X' number of staff for hoisting then these staff should be present for the entire duration of the hoisting activity.
Hoists and slings should never be operated by untrained or unskilled staff. If staff are unsure of their ability to use a holst or sling safely they should seek guidance from their line manager or supervisor.
Chair to Chair Transfers
Guide (Black arrows indicate the client's movement, red the care workers)
Independent but unstable client.
Put chairs at a close angle so that the client can hold on to both chairs without overreaching and transfer client by getting them to push on arm of exiting chair and pull on arm of receiving chair. Can use turntable under feet to assist move, plus care worker may offer assistance by kneeling in front of client and guiding hips across
One care worker to assist.
Chairs at an angle with at least a foot space -receiving chair can be placed slightly in front of exiting chair to limit amount of walking backwards for client client should be able to see chair, care worker to assist from opposite side to receiving chair. Walk client forward to chair and then turn gently. Receiving chair should be right behind them.

Two care workers to assist.
Same as above with walking client but more space needed, receiving chair will not be in front of exiting chair as second care worker needs space to move around - client will have to step backwards a short distance

Where space is limited.
Chair to chair transfer with chairs in front of each other. Place exiting and receiving chair immediately in front of each other. Two care workers to stand client One care worker to drop hand to hips other care worker to support shoulders to turn client slowly 180 degrees, ready to sit into receiving chair.

Beware with all transfers when sitting client into chair. Remember:
- allow client to feel chair at back of knees
- simple command to client (e.g. 'bend in the middle) you may ask them to feel for arms of chair if appropriate
- watch their movement
- as client sits down, care workers to side lunge (with knees bent) or step to back of chair to avoid twisting, or overreaching
- move arm up client's back as client is close to chair to avoid trapping your hand
- remember to avoid giving clients negative commands if you can. Saying to them "keep standing" is better than saying "do not sit down yet"
- make sure the client can see the chair they are going to. Reassure them of the short distance between the chair they are leaving and the chair to which they are moving.
Equipment used: Handling belt (optional) if client requires it The picture illustrates a client undertaking a transfer independently due to efficient positioning of the two chairs
The picture below illustrates a client undertaking a transfer independently due to efficient positioning of the two chairs
Sitting to Sitting Transfers Using Various Equipment
Rotating Boards/Turntables
These are boards that rotate and are placed on the floor to assist the client to move their feet around when transferring. They can be used independently by a client and perhaps in conjunction with a transfer board. Alternatively care workers can give minimal physical assistance to turn the client's trunk whilst the board moves the feet.

Transfer Boards/Banana' Boards
These static boards provide a bridge between two level seated surfaces, where there may be a slight gap. They can be used independently by a client or with minimal assistance from a care worker. If a care worker is assisting they should ensure they do not twist their trunk as the client moves across the board. The chairs could be positioned at an angle to each other. If using a straight transfer board, chairs could be positioned side by side or opposite each other depending on the space available. It is important that the client is positioned centrally on the board to avoid the risk of it tipping forward. If the board has underside grippers, they must be positioned on each sealed surface.

Combining Transfer Aids
Turntables and transfer boards can be used in conjunction to aid a transfer. The height of the care equipment in this case a bed and wheelchair) should be considered as they need to be more-or-less level and the gap between them not too wide. A wheelchair where the arms can be removed works well here, as the chair can be moved closer to the bed and the curve in the transfer board enables it to by-pass the large wheel. The client is unlikely to need much assistance from the care worker if both pieces of equipment are in use and the care equipment is positioned correctly and is stable.

Standing Turners or Framed Turn Discs
These are used to effect a sitting to sitting transfer. The brake must be applied by the care worker as the client uses the handle or chair arms to push/pull into a standing position. Once stood on the turntable base, the brake is released and the client is moved so that they are in front of the receiving chair. Before descent the brake is applied again and the client will be encouraged to feel for the chair arms and to sit back down. A support belt (as pictured) is a useful addition for the nervous client as additional support. These belts are specifically designed to be used in conjunction with a particular product and not all designs have this feature.

Standing Transporters
These aids give a good amount of assistance for clients who are struggling to stand and need additional assistance to move between seated surfaces The client needs to be able to raise themselves from the chair, or may require minimal assistance to do so. The client places their feet onto the aid and moves into standing whilst the seat is up. The aid can transport the client a short distance whilst they sit on the perched seat. When the client brings themselves back into a standing position the seat is removed from behind them to allow them to sit back down on the chair.

Movement Whilst Adjusting Clothing/Bringing a Chair Behind a Client for Sitting
The safest way to adjust clothing - for toileting purposes, changing continence pads, etc when two care workers are assisting is for one care worker to support the client whilst the second care worker adjusts clothing. This can be achieved by the supporting care worker leaning the client very slightly towards them whilst they adopt the forward step hold dropping a log backwards at an oblique angle knees flexed for additional stability. This releases the second care worker to adjust clothing whilst ensuring the client does not feel vulnerable and liable to fall. The care workers can then swap roles il further adjustment of clothing is required.
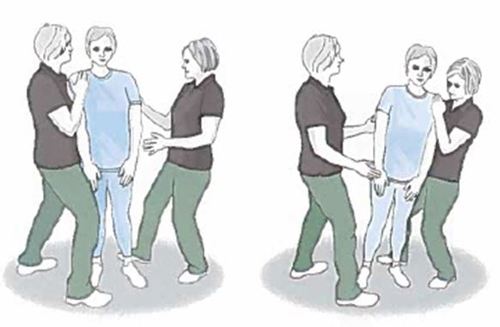
This same technique can be utilised to bring a wheelchair or similar up behind a client to enable them to sit. This is particularly useful for a client who prefers not to have to walk backwards.
Chair Moves (Positioning Ready for Exit & Standing Assistance)
To facilitate effective standing from a chair the client will need to be positioned approximately one third of the way from the back of the seat.
Bringing Client Forward in the Chair
Minimum Assistance
Ask client to bring their shoulders forward, care worker to kneel in front of client (preferably on one knee only). Client to lean to one side of chair with both hands on the chair arm. Care worker to slide forward and opposite buttock forward from the hip by applying pressure whilst at the same time applying slight pressure to side of knee to ease leg forward. It may help to change to the other knee and swop sides to ease the other hip forward.

Moderate Assistance
I access to the client's hips is not possible due to client's weight or height (long legs) or chair design, a handling belt or handling sling may be incorporated by sliding it down the back to behind the hips and using the handles as your point of contact. Follow techniques as above, however, be sure that this does not become a pulling or dragging action, and that the client is still assisting with the move forward in the chair. On some occasions, care workers may either not be able to kneel on the floor due to a pre-existing condition, or may not wish to kneel on the floor due to infection control concerns. In these situations, the care worker may opt to sit on a chair or wheeled stool in front of the client. The care worker must consider their own posture and the proximity they are to the client.
Equipment used: Handling sling or handling belt (optional)
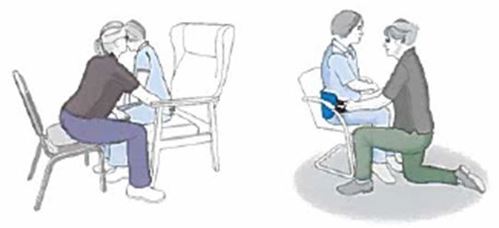
Assisting Client in Readiness for Standing - Position Applicable to all Standing and Transferring moves.
Client's Head and Shoulder Position
Looking forward - "nose over toes (though not literally), then lean shoulders back to gain momentum) Lifting head in the line of movement when almost stood

Client's Feet Position
Shoulder width apart, one foot slightly in front of the other if going to walk and for increased stability. You can advise the client to position one foot under their bottom and one under their knee for guidance. Strong foot back. However, if a client is merely standing (to sit straight down again) or the client requires encouragement to step/walk. positioning their feet slightly apart but alongside each other may be advised.

For care worker to reposition legs - Support call, put hand over foot. Do not grab behind knee or shin.
Client's Arm Position
On chair arms or on own knees if no chair arm. The client pushing on their own knees is usually easier for them only if in the right position to do so. Il client has a one-sided weakness, it may be appropriate for them to push on their own knee, rather than the chair arm-to avoid twisting and overbalancing. Strongly discourage the client from using a walking aid (e.g. Zimmer frame) for standing assistance.
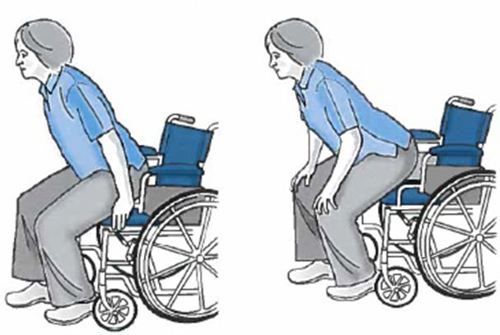
If a client is having difficulty with exiting the chair consider a riser recliner chair, an inflatable chair cushion, etc.
Before we look at sitting to standing moves more specifically it is really important to understand the process that the client has to go through to achieve this task as safely as possible. There are three phases of movement for them.
- Weight transfer phase - Client to sit perched and ready to move.
- Transition phase - Client has left the chair surface.
- Extension phase -client is fully upright, and stability should be achieved.
For safer sit to standing each relevant practical move recognises these phases.
As an additional assessment of the client's physical capabilities and stability the care worker could ask that the client (once stood and stable) raises and lowers each foot one at a time. This is an extension of the 'Ability Testing' on page 140 and will indicate the clients stability and limb capability Additionally, the client could step each foot forward one at a time and return to the back of the chair giving the care worker further information about their mobility level before they exit the chair space. It is important that the above assessment is undertaken whilst the chair remains directly behind the client for safety considerations. The assessment need only be considered if the client is about to undertake a manual (walking, stepping) transfer once stood.
Offering Hand Assistance when Standing and Mobilising
Clients will occasionally need the care workers to offer them physical assistance when standing or when mobilising. The care workers hand support should ensure no pain or discomfort is caused to the client. This can be achieved by ensuring they use a palmar hold' - an open palm keeping fingers and thumb together and slightly flexed. This can easily be remembered as 'paws not claws'

You could offer a palmar hold to the client's shoulder. Palm flat to the front of the shoulder 'cupping' it - no pressure under the finger tips.

Alternatively, you could support their hands (see below). However, it is not always advised to trap your thumb in the client's hand as you will be less able to release their grip should you need to do so.
care worker thumb bent into hand to avoid injury The care worker's thumb can be bent into their palm to avoid injury it required
care worker and clients hands joined The care worker should not apply any pressure down through their thumb

Often care workers will need to give further support by placing a hand across the client's back.
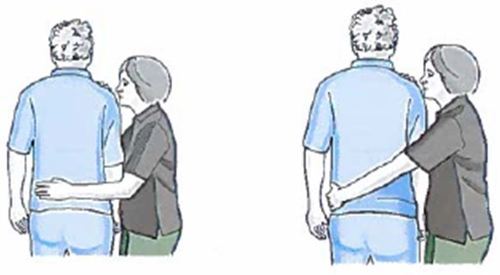
How far across a client's back the hand is placed will depend on the level of support required as well as the size of client or care worker.
Once again the supporting hand should still be placed in palmar' hold style. The palm should be flat, fingers and thumb together and flexed.

Getting Your Feet in the Correct Position
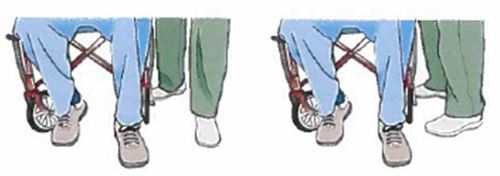
The sit to stand moves in this book always have the care worker's feet set apart either in an 'L' shape, both facing forward or at an oblique angle, or both facing sideways. These positions offer maximum stability for the care workers though the oblique angle is generally more comfortable for staff.
Offering Assistance with a Handling Belt
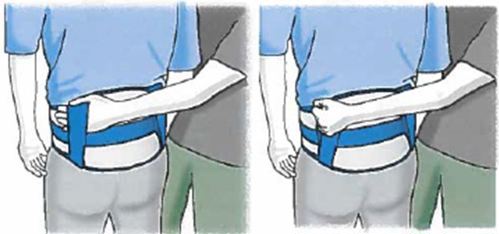
Handling belts can offer additional support for clients when standing from sitting. Ensure the care worker's thumb is not trapped in the belt and ensure you have the correct size to fit the client comfortably.
Handling belts should not be used on clients with abdominal pain/discomfort or injury and should not be used if a person is pregnant. Belts are not intended to be used to lift the client. The care worker's elbows should remain down against the client's back as raised elbows suggest a lifting action and should be discouraged.
Falling Assistance
Managing the Falling Client
Be guided by your company policy on this subject.
The manual handling or health and safety policy made available to you by your employer should indicate what is expected of staff regarding the falling client. In some organisations a 'controlled descent' is not permitted and staff are instructed to give no physical assistance to the falling client though it is widely acknowledged that this may be difficult to enforce as it goes against a natural instinct.
However, if this policy statement is not in place, the first priority will always be to assess the falling client as to whether the care worker is able to give any level of physical assistance.
There is a very real risk of significant harm to a care worker who attempts to 'catch the falling client. It is very unlikely that your company health and safety policy will permit or encourage staff to do this. The advice sometimes given to care workers in this situation is to firstly attempt to persuade the falling client to stand or possibly redirect them to a bed surface or soft chair. If these options are not possible, and the care worker is in an appropriate position to assist and it appears relatively safe to do so, the following technique (see over) may be executed immediately.
If the care worker is not in an appropriate position to assist the client In this way, then the only thing possible would be to protect the client's head and face from injury if able and appropriate to do so. Staff should be aware that if the client is larger than the care worker then the risk of harm to themselves whilst undertaking a 'controlled descent' is significantly higher.
During manual handling training sessions it is not generally advised to practise this technique. Staff will, however, require instruction on what to do and this may be given by showing staff a filmed technique or showing them pictorial images with instructions.
Step One:
The care worker should relax his or her hold on the client and move behind the client. Maintaining a stable position with a 'L' shaped stance.

Step Two:
The care worker should open their hands and take one step back-keeping their feet apart and knees relaxed for stability

Step Three:
As the care worker begins to move backwards, they should allow the client to slide down their body either down the front of the care worker or slightly to the (inner) side of their leg which gives the care worker more stability to enable them to move to the floor slowly, though be very mindful of possible weight against the care worker's leg. The client will either land on their knees or their bottom but this will generally be out of the care worker's control.

Step Four:
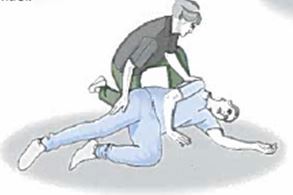
Once on the floor, the client can be moved into a 'recovery position' if it is appropriate to do so.
Managing the Fallen Client
Assessment of the client will be required following a fall. If not injured you will have time to think. A physical listing of a person of adult proportions from the floor should only be considered in extremely challenging or life-threatening circumstances. Your usual options for this task are:
- Instruct how to get themselves up from floor (See Biomechanics' section)
- Use of an inflatable lifting device, or a mechanical seat to raise them
- Use of an all purpose hoist to lift them. If required to move client to more spacious area - use a slide-sheet (see next section) under the full length of the client il possible and slide slowly to a more accessible space.

